The 3D GamemakerDeveloper: The Game Creators Ltd. |
 |
Overview
“Now anyone can build their ideal game in seconds. With just one click of a mouse, you can create a uniquely playable game without needing any programming knowledge or artistic skills at all.” – The 3D Gamemaker homepage
Of all the game creators created by The Game Creators, 3D Gamemaker was the creator that delivered the most. It shipped with hundreds of assets and had two modes – Beginner and Advanced – to allow users to create games based on how deep they wanted to dive into the process. A person could literally generate a complete game in about 90 seconds if they wanted to. Sadly, I don’t think many people knew it even existed.
The Tools and Process
 The 3D Gamemaker has nine categories of options to configure for your game.
- Scene
- Player Character
- Player projectiles/bullets
- Enemies
- Enemy projectiles/bullets
- Obstacles
- End Boss
- Pickups (health, energy, mana, etc)
- Game info (name, author, description)
For the first eight categories, you can choose objects from eight different genres of assets: Shooter, Horror, War, Space, Driving, Jungle, Cartoon, and Silly.
Each genre has multiple items to choose from. You can also, mix and match objects from different genres. For example, you can select a zombie from the Horror tab, a robot from the Space tab, and a tank from the War tab to be the enemies in your game. For each of these objects you can also change the sounds and textures.
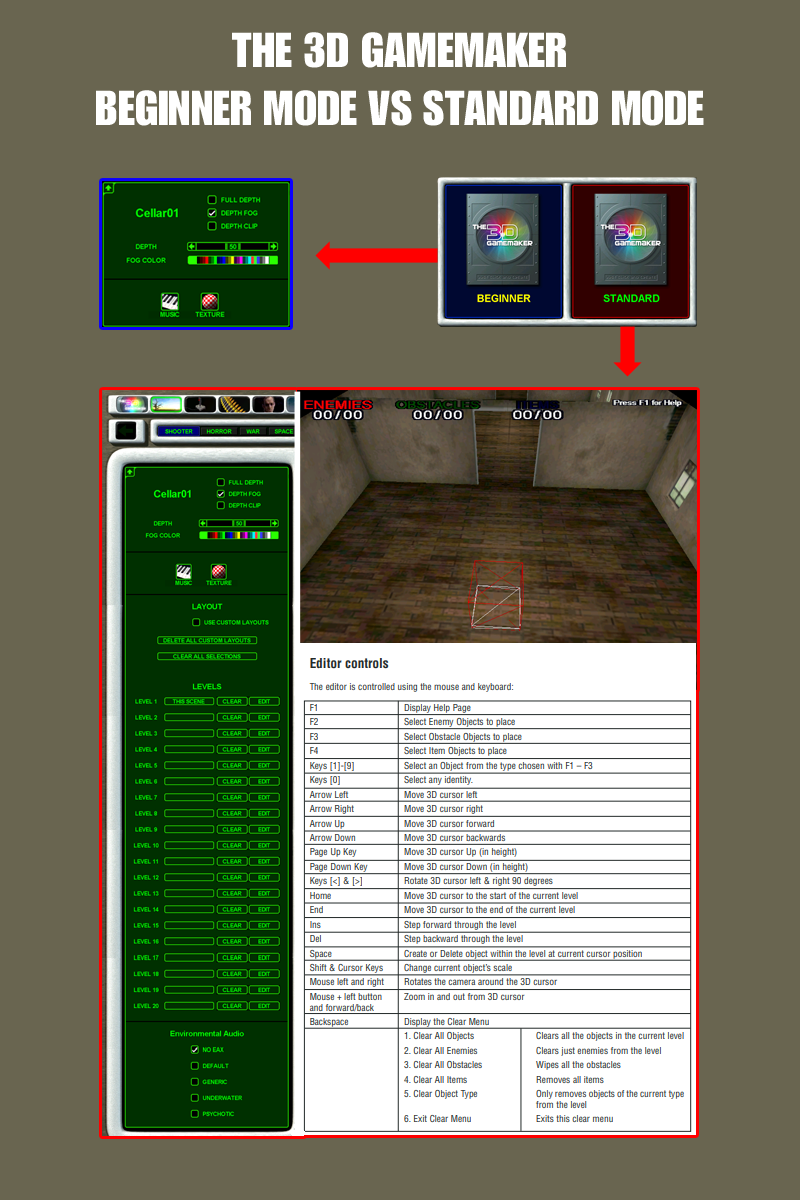
Click to Enlarge
Even in Beginner Mode, the number of options starts to really expand the more you dig in. So then, how much more is in Standard Mode? The screenshot on the right shows the difference in options for the Scene Tab.
The crazy thing is that’s just the start of it. If you click the arrow to the right of the genres, it reveals a User option. From there, you have a complete scene editor (dunno why, but the choice of the term “scene” over “map” or “level” bugs me) for creating your own maps/levels.
The 3D Gamemaker also includes a built-in sound record for creating new sound effects on the fly. It’s certainly no SoundForge, but it is a quick-n-easy way to add new sounds to your game.
Up to this point, everything has been clear, intuitive, and easy-to-use. So now, let’s look at adding our own custom assets.
Okay, so say I want to add a 3D model. All I need to do is… well, let’s just paste the instructions from the manual, and then take it from there:
All custom models appear within the “User” section of The 3D Gamemaker. In order for your model to
appear you have to do the following:Using Windows Explorer, go into the Objects directory within The 3D Gamemaker (typically this is C:\Program Files\Dark Basic Software\The 3D Gamemaker\Objects – depending on the path selected when you installed the program).
You will find a folder called “09User”. Open this and you’ll find 8 more folders.
In this example we’re going to import the model of an alien into the Enemy section, so open the folder “4Enemy”.
You have to create a directory with the same name as your model. Our model is called alien.x, so we use Windows Explorer to create a new folder called “alien”.
It is very important to name the folder exactly the same as the filename of the model.
Now you are ready to copy the model into the folder.ACCEPTABLE OBJECT TYPES
The 3D Gamemaker will only work with DirectX format 3D models (.X models). This means if your source model is a 3D Studio file for example (.3DS) then it’ll need to be converted to the .X format before you can import it. There are many great packages on the market that will do this for you, one of the best and easiest to use is 3D Exploration by X Dimension Software and you can download a free trial version from their web site at: http://www.us.righthemisphere.com/3dexploration/
Once you have your model in .X format, you should double check that the filename matches the folder you’ve just created. If your folder is called “alien” then the model should be called “alien.x”. Copy your model and any associated texture files into the directory. The texture files must be in BMP or DDS format and are typically generated by the 3D package used to create or convert your model. The textures are internally referenced by the model itself, so do not have to be renamed (indeed your
model will appear un-textured if you do so)CREATING A THUMBNAIL
So you’ve got your model in .X format, you’ve created the folder and copied everything across – the only thing left to do is create a thumbnail to appear within The 3D Gamemaker window. How you create the thumbnail is up to you, perhaps you might like to render a small version of it or screen grab from your 3D package. Whatever you decide there are 3 things to bear in mind:
1. The thumbnail must be 110×97 pixels in size.
2. The thumbnail must be a 16-bit BMP file (or higher).
3. The thumbnail file must be called “thumb.bmp”Once created, copy the thumb.bmp into the folder containing your model. You can now launch The 3D Gamemaker and when you click on the “Enemy” button and then “User” your thumbnail will appear.
Clicking on the thumbnail will load your object and you can then modify its properties just as if it was
any other 3D Gamemaker supplied object.
So, while The 3D Gamemaker does have the option to import your own assets, it goes completely off the rails in the opposite direction, with a process one would expect to read on a hacking/modding site, not in the manual for a “one-click, no skill needed” game maker.
For Objectives and Win conditions, you have a decent collection of options: kill the boss, kill all baddies, collect all items, and complete x laps. You can set multiple objectives for the win condition, as well. There is also a timer option if you want your players to complete the tasks within a certain time limit to win.
My Creation
For this, I went back to the marketing pitch:
“Now anyone can build their ideal game in seconds. With just one click of a mouse, you can create a uniquely playable game without needing any programming knowledge or artistic skills at all.” – The 3D Gamemaker homepage
So I tried exactly that. I went straight down the row of categories, clicking on choices that seemed like they’d make some semblance of sense together. A Death Valley-looking place, a JEEP/HUMM-V thing, rocks, cactus, vultures… you get the idea. The longest part of the process so far was typing out the description.
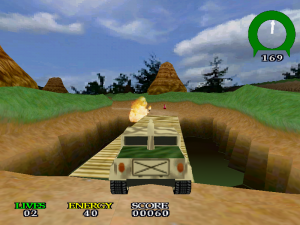
So then I run it. The sales pitch did not exaggerate.
Two minutes. A complete game.
No coding or art experience required.
It was entertaining enough that I invested another half hour or so into the project, adding a few obstacle areas to the level in the scene editor, and importing a custom backdrop for the titlescreen and highscore screen.
I now present… Gulch Gunner!
Other games made with The 3D Gamemaker:
- Dark Twilight
- Helium Chase (2-player)
- City of the Death
Will people recognize a game is from this maker/creator?
With the sale of created games being prohibited and the relative obscurity of the title, it’s doubtful many have seen enough games from it to recognize the source, although that weird default compass does is a rather telltale feature.
So I leave you with GULCH GUNNER. At around 15Megs, it’s a pocket-sized game that’s good for killing a few minutes. It’s a shame that TGC never upgraded or revisited this. Some shaders, updated graphics, and a few more options could make for a pretty fun gamemaker.

3D Gamemaker
0.00
Pros
- Very easy to use
- Hundreds of assets
- A great app for budding young game devs
- Can't sell games created with it
Cons
- Outdated graphics
- Doesn't run on some modern systems
- Formats and process for importing is less than stellar
- Can't sell games created with it
Be the first to comment